WireMode
-
class
ledwall.components.WireMode¶ The wire mode describes the way, the leds are organized on the board. Two ways of wiring are supported. LTR and ZIGZAG. The WireMode class is an Enum. Whenever you have to specifiy a mode, you simply write
WireMode.LTRorWireMode.ZIGZAGWireMde.LTR (Left-To-Right)
In the mode WireMode.LTR, all rows are going from left to right. The cable for the data line (blue) goes all the way back from the end of one row to the beginning of the next row.
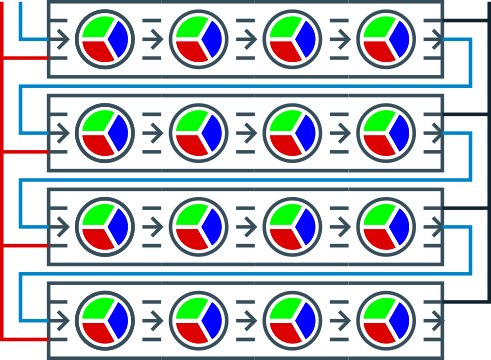
WireMode.LTR
WireMode.ZIGZAG
In the mode WireMode.ZIGZAG all even rows go from left to right where as the the odd rows go from right to left. Organizing leds in this way saves a lot of cable for the data line (blue).
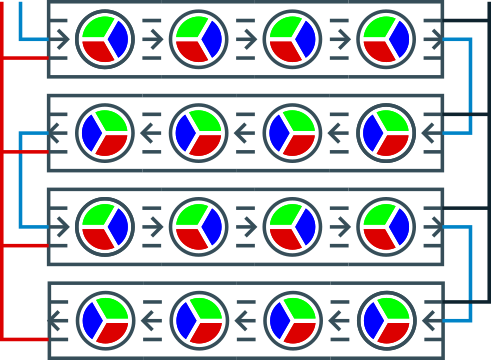
WireMode.ZIGZAG
Display
-
class
ledwall.components.Display(cols, rows, sender=None, framerate=None, mode=<WireMode.LTR: 0>, panel_id='LEDPANEL', async=False)¶ Creates a new instance of a led display. The Display class manages a virtual representation of the color state of the LEDs on the physical panel. The class offers many methods to set and change colors. The physical LEDs are updated via the
update()method. Because there are different ways to connect the arduino (or ESP) to your computer, the transmission of the data is managed by an instance of aSender. This library offers several Implementations (SerialSender,MqttSender,UDPSender).The methods to manipulate the color state of the pixels pay respect to the wiring mode you used. There are two ways to layout of LEDs on the board specified by the WireMode parameter in the constructor.
A very basic program could look like this:
from ledwall.components import *

s = SerialSender()            # Creating a serial sender with the default port_name and baudrate
d = Display(16,32,s)          # Defining a new display component

red   = Color(255,0,0)        # Defining an RGB color
col   = HSVColor(0.7,0.8,1.0) # Defining an HSVColor

d.fill(green)
d.set_pixel(0,3,red)          # which is equivalent to d[(0,3)] = red or d[(0,3)] = (255,0,0)
d.set_pixel(14,23,col)

col.hue += 0.13               # Changing the HUE component of the color
d.set_pixel(15,23,col)        # Setting the pixel in this color

d.update()                    # Updating the physical component
Parameters: - cols (int) – The number of columns of the display
- rows (int) – The number of rows of the display.
- sender (Sender) – Instance of the sender (One of the subclasses, to be more precise)
- framerate (int) – The intended number of frames per second.
- mode (WireMode) – The mode that the LEDs are organized. Left-to-Right or Zig-Zag. Defaults to WireMode.LTR.
- panel_id (str) – An unique id for this panel. Currently not used.
- async (boolean) – If True, the update() method of the provided sender will be called asynchronously.
Return type: None
-
bounds¶ Returns a Rectangle instance where width is equal to the number of columns and height ist equal to the number of rows.
Returns: Rectangle with a size equal to the size of this display. Return type: Rectangle
-
clear(update=False)¶ Clears the display (sets all pixel to black)
Parameters: update (boolean) – If True, the display will be updated. Return type: None
-
columns¶ Returns: The number of columns on this display Return type: int
-
copy_region_from(src, rect_src=None, point_dst=Point(0, 0), transparent_color=None, update=False)¶ Copy a region from another display. If a transparent color is provided, all pixels in the source panel with the corresponding color will be ignored.
The region specified by the
RectanglerectSrc will be copied to position specified by pointDst. The parameter pointDst defaults to the upper left cornerPoint(0,0).Parameters: - src (Display) – The source display to copy the color values from.
- rect_src (Rectangle) – The position and the size of the region to copy. If no value is provided, it defaults to the size of self and position 0,0
- point_dst (Point) – Where to copy to. Defaults to (0,0)
- transparent_color (Color) – Color to ignore while copying. Defaults to None
- update (boolean) – Update display after this operation. Defaults to False
-
count¶ Returns: The number of pixels on this display Return type: int
-
data¶ Returns the raw byte array for the color data.
-
fill(color, update=False)¶ Fills the LED display in the specified color.
Parameters: - color (Color, tuple, list) – The color for the display. If you want to deactivate or clear the panel, just use black (0,0,0) as color value.
- update (boolean) – If True, the display will be updated.
Return type: None
-
fill_rect(x, y, w, h, color, update=False)¶ Fills a rectangle in the specified color
Parameters: - x (int) – X position of the top left corner
- y (int) – Y position of the top left corner
- w (int) – Width of the rectangle
- h (int) – Height of the rectangle
- color (Color, tuple, list) – The color for the rectangle. If you want to deactivate or clear a rectangle, just use black (0,0,0) as color value.
- update (boolean) – If True, the display will be updated.
Return type: None
-
frame¶ Returns: The current frame number Return type: int
-
frame_rate¶ Returns the framerate.
-
get_pixel(x, y)¶ Getting the color for a single pixel.
Returns the color for the pixel located at (x,y). The x value must be within the the range:
0 <= x < width. The y value must be with the range:0 <= y < heightParameters: - x (int) – The x position of the pixel. Must be a value with the following constraint:
0 <= x < width - y (int) – The number of rows of the display.
Return type: - x (int) – The x position of the pixel. Must be a value with the following constraint:
-
horizontal_line(row, color, update=False)¶ Drawing a horizontal line in the specified color.
The row value must be with the range:
0 <= row < heightParameters: - row (int) – The row to be filled.
- color (Color, tuple, list) – The color for the row. If you want to deactivate or clear a row, just use black (0,0,0) as color value.
- update (boolean) – If True, the display will be updated.
Return type: None
-
id¶ The panel id as set in the constructor. (read-only)
-
load_image(path, update=False, transparent_color=None)¶ Loads an image into the LED buffer.
The method loads an image located at path into the LED buffer. If a transparent color is provided, all transparent colors are ignored. If update = True the panel data will be updated immediately.
Parameters: - path (str) – The relative or absolute path to the image. The method uses the PIL library for reading the file. So any file type supported by PIL is supported by this method.
- update (boolean) – If True, the panel gets updated via the sender component. Defaults to False
- transparent_color (tuple) – The color which defines transparency. Defaults to None.
-
move(count=1)¶ Moves all pixels in the buffer.
Warning
This method does not take the
modeinto account. So the visual effect differs depending on the mode.Parameters: count (int) – The amount each pixel is moved.
-
static
odd_row(row)¶ Parameters: row (int) – Test, if the index of the row is even (False) or odd (True) Returns: True, if row is odd, False else.
-
rows¶ Returns: The number of rows on this display Return type: int
-
set_pixel(x, y, color, update=False)¶ Setting the color for a single pixel.
Returns True, if setting the pixel was successful, Fales else. The color is specified by a color instance. The method also accepts tuples or arrays as colors. The length has to be at least 3 and must contain the value for red, green, and blue.
The following lines have the same effect.
d.set_pixel(0,3,red,True)
d.set_pixel(0,3,(255,0,0),True)
d.set_pixel(0,3,[255,0,0],True)
Parameters: - x (int) – The x position of the pixel. Must be a value with the following constraint:
0 <= x < width - y (int) – The number of rows of the display.
- color (Color, tuple, list) – The color for the pixel. If you want to deactivate or clear a pixel, just use black (0,0,0) as color value.
- update (boolean) – If True, the display will be updated.
Return type: boolean
- x (int) – The x position of the pixel. Must be a value with the following constraint:
-
shift_left(update=False)¶ Shifts all pixels to the left.
The method shift pixels to the left visually, because the method takes the mode into account. This means, if the mode is
MODE_ZIGZAGand the row number is odd, then the pixels are shifted physically to the right. But because this row reads left to right, the pixels are shifted visually to the left.The pixel to the outermost left will be placed at the last column. So this method implements a rotation of the pixels.
Parameters: update (boolean) – If True, the display will be updated. Return type: None
-
shift_right(update=False)¶ Shifts all pixels to the right.
The method shift pixels to the right visually, because the method takes the mode into account. This means, if the mode is
MODE_ZIGZAGand the row number is odd, then the pixela are shifted physically to the left. But because this row reads left to right, the pixels are shifted visually to the right.The pixel to the outermost right will be placed at the first column. So this method implements a rotation of the pixels.
Parameters: update (boolean) – If True, the display will be updated. Return type: None
-
shift_row_left(row, update=False)¶ Shifts row one pixel to the left. The outermost left pixel will be plced to the right. So actually it rotates the pixels in the row. The method pays respect to the
modeproperty.Parameters: row (int) – Test, if the index of the row is even (False) or odd (True)
-
shift_row_right(row, update=False)¶ Shifts all pixels in the specified row to the right.
The method shift pixels to the right visually, because the method takes the mode into account. This means, if the mode is
MODE_ZIGZAGand the row number is odd, then the pixels are shifted physically to the left. But because this row reads left to right, the pixels are shifted visually to the right.The pixel to the outermost right will be placed at the first column. So this method implements a rotation of the pixels.
Parameters: - row (int) – The number of the row to be shifted. The row value must be with the range:
0 <= row < height - update (boolean) – If True, the display will be updated.
Return type: None
- row (int) – The number of the row to be shifted. The row value must be with the range:
-
update(update=True)¶ Updates the LED display
The internal frame buffer is send to the arduino board and the LED stripe gets updated.
The method takes framerate into account. If the time between this update and the last update is less then the milliseconds per frame, the method will sleep ‘til the end of the frame and update the data at the end of the frame.
Every time the LED display is updated, the frame number will be increased by one.
Note
If you are interested to see the time consumed by transferring the date to the arduino, you can read the transmissionInfo property after updating. The following code snippet shows the basic usage:
Read out the timings for transmission:
d.fill(Color(255,0,0))
print d.transmission_info
Parameters: update (boolean) – If True, the display will be updated. Return type: None
-
vertical_line(column, color, update=False)¶ Drawing a vertical line in the specified color. See also
horizontal_line()The column value must be with the range:
0 <= column < widthParameters: Return type: None